Favorite Fall Recipes from the Haute Hijab Team!
Lifestyle
|
Nov 18, 2020
|
7 MIN READ

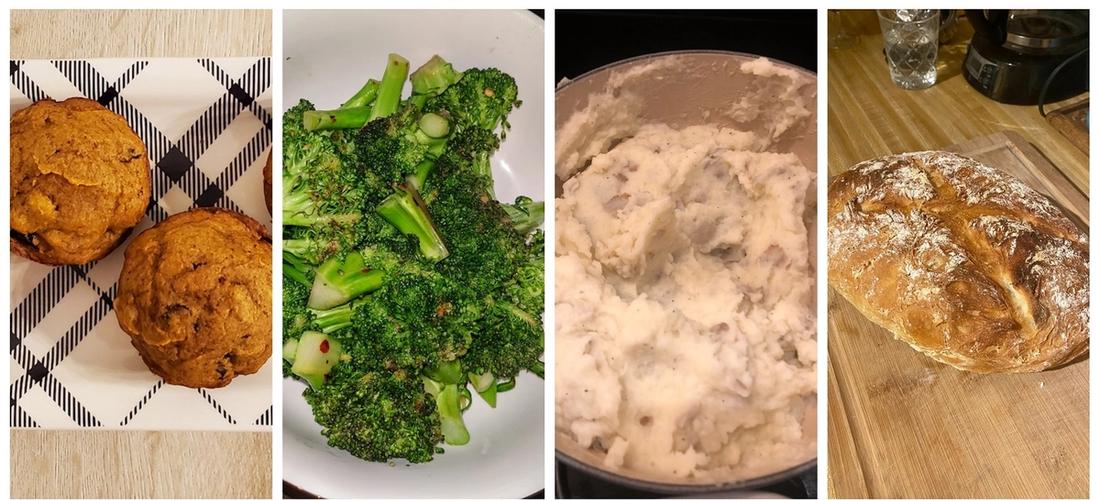
Pumpking muffins, stir-fry broccoli, mashed potatoes and rustic bread from the HH team!
If there is one thing 2020 has us doing more, it’s entering the kitchen to cook, bake, steam, grill and generally flex or build some culinary skill. For some of us, it’s been a pleasant distraction from the worry, fear and chaos that has permeated much of this year. For others, it has become honestly a bit wearisome, as we may be cooking daily already and now are bereft of ideas about what to make or how to even make meal prep, cooking and eating fun again.
Our Haute Hijab team also experiences the spectrum of these feelings on our internal Food slack channel, where we commiserate about what to make for dinner, ask each other for ways to prepare chicken for the zillionth time and share food pics to up each other’s games and, yes, taunt each other a little about what we are eating for dinner tonight! :)
With the Thanksgiving holiday upon us next week, whether or not we are able to meet with our family (please, stay safe and make good decisions everyone), the traditions of cooking and eating together as a nuclear family or maybe by ourselves is still a way to cultivate warmth, gratitude and love. So, our team would like to share some of our favorite recipes with you. We’re not chefs, but we do like to eat!
Bismillah, and enjoy!
Pumpkin Muffins by Sandy, Our CX Associate

Writes Sandy: These were born from me not knowing what to do with the pumpkins my kids insisted on getting from the grocery store, lol! They have more of a banana bread consistency than a cake-like consistency.
Ingredients
About 3 cups of pumpkin; please note: If you are working with a whole pumpkin, cut it open, get rid of the seeds, add a little bit of water inside a pan and put the pumpkin face down and bake at 350 until tender, so like 45 minutes to an hour. Then it's ready for using in this recipe.
1 cup of softened butter
2 cups sugar
4 eggs, beaten
3 cups of flour
2 tsp baking soda
1 tsp salt
1.5 tsp cinnamon
1 tsp ground cloves
1/2 tsp ground ginger
Walnuts and dried cranberries to your liking
Method
1. Pre-heat oven to 325
2. Cream together butter and sugar
3. Add eggs and pumpkin
4. Sift together flour, baking soda, salt and spices
5. Add the pumpkin mix to the flour mix
6. Sprinkle in crushed walnuts and dried cranberries
7. Spoon into muffin tins lined with muffin paper
8. Bake for about 24 minutes or until a toothpick comes out clean
Makes 24-30
Stir-Friday Broccoli by Matt, our SEM Specialist

Writes Matt: Don’t let the name fool you. This does not taste like beef with broccoli. It can be used in that dish, but it is also great with meats, poultry or on it’s own.
Ingredients
Two heads of broccoli
Two cloves of garlic
1/4 cup of water
One tbsp oil (I use avocado oil)
Salt, pepper to taste
One tsp or more to taste of red pepper flakes
Method
1. Crush two cloves of garlic, remove skins, let rest for a couple minutes while you cut broccoli.
2. Cut broccoli into bite sized florets. Try to get them all into a similar size, so they cook evenly. Also, don’t be afraid to use some of the stalk! Don’t let it go to waste. Finely mince garlic.
3. Add the oil to a large pan. Set your burner to medium/medium high. Add broccoli.
4. Cook on medium/medium high for five minutes. Stir occasionally.
5. Add the quarter cup of water, garlic, salt pepper to taste and teaspoon of chili flake (if desired).
6. Wait for water to evaporate off, about 2-5 minutes.
7. Test broccoli with a fork; you’re looking for a slight “crunch,” not mushy.
8. If texture is to your liking, you’re done! Adding the water will slightly steam the broccoli as well as help get the salt, pepper, garlic, and chili flakes into every nook and cranny of the broccoli. Pro tip: The broccoli changes into this great bright green when it’s ready.
9. Eat!
Easiest-Ever Rustic Homemade Bread by Erin, our Product Manager
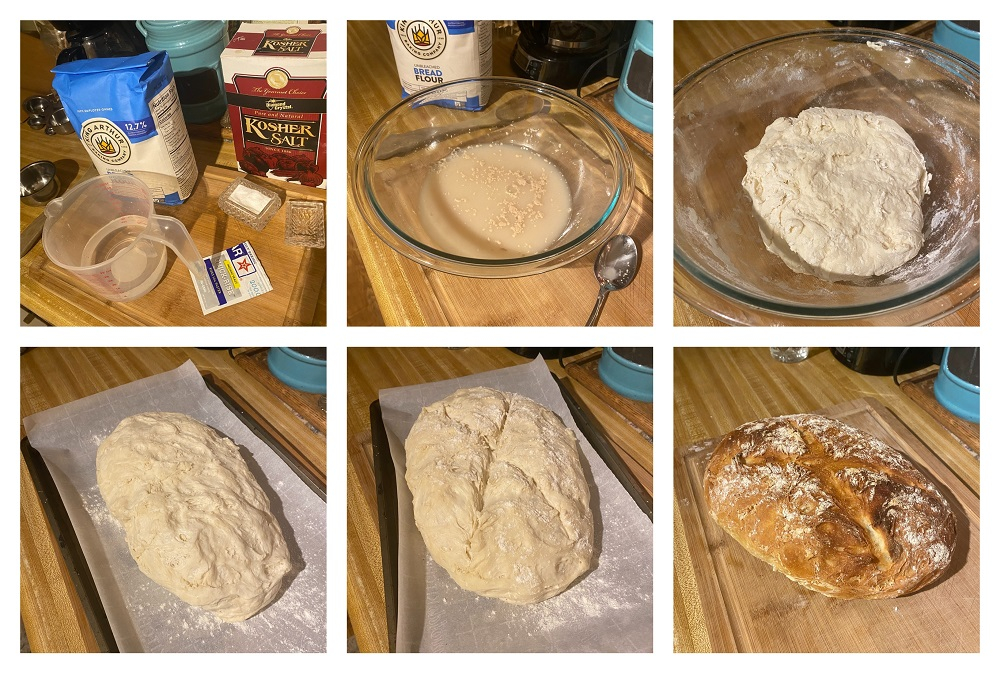
Writes Erin: Nothing beats a crusty loaf of homemade bread, straight out of the oven. Bread baking is one of those things that I always thought seemed intimidating and hard to do, but it's actually incredibly easy to whip up a perfectly respectable loaf! Ever since I moved to Vermont over the summer, I've been making these at least once a week. Keep it simple for dipping in soups, making sandwiches or – my personal favorite – spreading with a little goat cheese and fig jam. Or, mix in your favorite dried herbs or minced garlic to add a flavorful twist for your Thanksgiving table!
Ingredients
3 cups of bread flour; all-purpose flour will also work if you don't have bread flour.
1 packet of quick-rise or "instant" yeast. Regular "active dry" yeast works fine too, but you'll need to double your rise time.
1 1/2 cups warm water. It should feel warmer than room temperature and lukewarm to the touch, but not hot – too hot will kill your yeast!
1 1/2 teaspoons salt. I really like to use Diamond kosher salt rather than table salt. It dissolves better and has a more delicate flavor.
Method
1. First, proof the yeast. Pour your warm water into a large mixing bowl and sprinkle the yeast on top, then stir to combine. After about five minutes, it should start to develop bubbles on the surface.
2. Next, add the salt and stir to dissolve. If you wish to add any bonus herbs or flavorings, this is the best time to do it!
3. Add your flour. If you're like me and don't have a flour sifter, I recommend spooning the flour into your measuring cup for the most accurate measurement. If you scoop it straight out of the bag with your measuring cup, it compacts the flour and you could end up adding more than you need, which results in a denser, heavier loaf.
4. Mix it all together with a wooden spoon until it forms a shaggy dough and there are no visible specks of flour left. With your hands, lightly fold the dough under to form a smoother ball and place back in the bowl.
5. Cover loosely with a tea towel and set aside to rise for at least an hour and up to three hours. (If using active dry yeast rather than instant, let it rise for at least two hours.)
6. Line a baking sheet with parchment paper, then sprinkle a little flour onto the paper.
7. Scrape your dough out onto the sheet in one piece and very gently shape into an oval. The dough will be loose and sticky – that's a good thing! The trick to getting the airiest texture with this dough is to work it as little as possible, so feel free to embrace the rustic look rather than obsess over making it a perfect shape.
8. Sprinkle a little flour over the top and set it aside to rest for 40 minutes before baking.
9. Meanwhile, prep your oven. Start by preheating it to 425 degrees. Place your top rack in the center position of the oven. Take a cake pan or other oven-safe dish and fill it about 1 inch full of water, then place it on the bottom rack. The steam will help your loaf to stay moist while baking.
10. After your loaf has rested for 40 minutes, lightly score the top with a serrated knife. You can do a simple "X" pattern or get funky with it. Pinterest has tons of creative scoring ideas!
11. Place your loaf on the top rack and push it to the back of the oven – most ovens burn hottest in the back, so this gets you the most bang for your buck!
12. Bake for 25 minutes, then remove the pan of water and bake for an additional 5 minutes.
13. Remove your loaf from the oven, place onto a cooling rack and let cool a bit before slicing. If you're anything like me, you'll be lucky if you can resist breaking into it for more than two minutes. But at least try. I believe in you!
14. Slice and serve! Store in an airtight bag at room temperature for up to three days.
Creamy Garlic Mashed Potatoes by Lily, our Product Development Manager
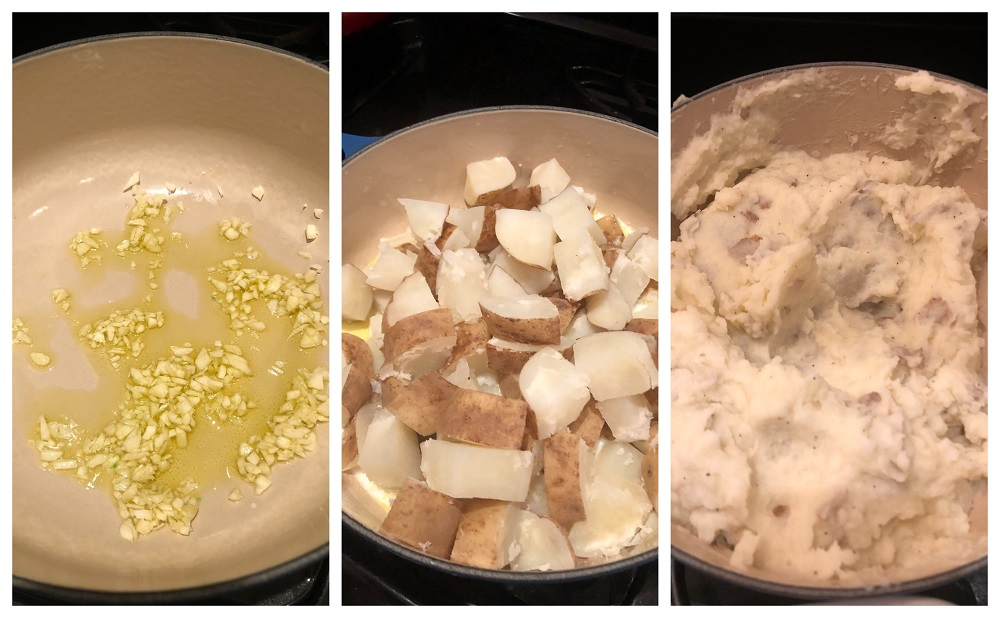
Writes Lily: I like making mashed potatoes in my family because I like to make sure there is plenty of butter and garlic. So, I want to make sure I am the one making them! Also we have a lot of really good cooks in my family, and it is not easy to get authorization to make the turkey or the gravy. But I am allowed to handle the mashed potatoes! :)
Ingredients
3 pounds of potatoes
4 cloves garlic
3/4 cup of milk
Salt and freshly ground black pepper
6 tbsp unsalted butter softened
1 tsp of olive oil
Method
1. Peel the potatoes. (If you want – I never do and my family almost never notices. but if you leave the peel on, scrub your potatoes well.) Once peeled, chop the potatoes into one-inch cubes and cover with water in a large pot. Cook until the potatoes are tender, about 20 minutes.
2. Heat olive oil in a skillet or pot. Finely chop the garlic and add to the olive. Cook until the garlic starts to brown.
3. Drain the potatoes and combine with the garlic and oil.
4. Add butter, milk, salt and pepper and mash until smooth.
5. Taste and add salt and pepper as needed.
Happy eating, friends! Comment below with some things you've learned to cook while at home these past several months or some of your favorite dishes to make and eat!
Subscribe to be the first to know about new product releases, styling ideas and more.
What products are you interested in?